
Mixing Greens: Tried and Tested Recipes
If you’ve ever put down a green and immediately thought, “Nope,” this post is for you.
Here are two base-green mixes that keep you in control from the start, plus the simplest way I know to shift temperature and value when you’re starting out.
I’ve mixed these colors using Golden's OPEN acrylic paint because they dry much slower than traditional acrylic paints and give me more time to futz around, but these recipes work for oils and regular acrylic paint as well.
BTW, if you haven’t already, read my earlier post on mixing greens for a good foundation.
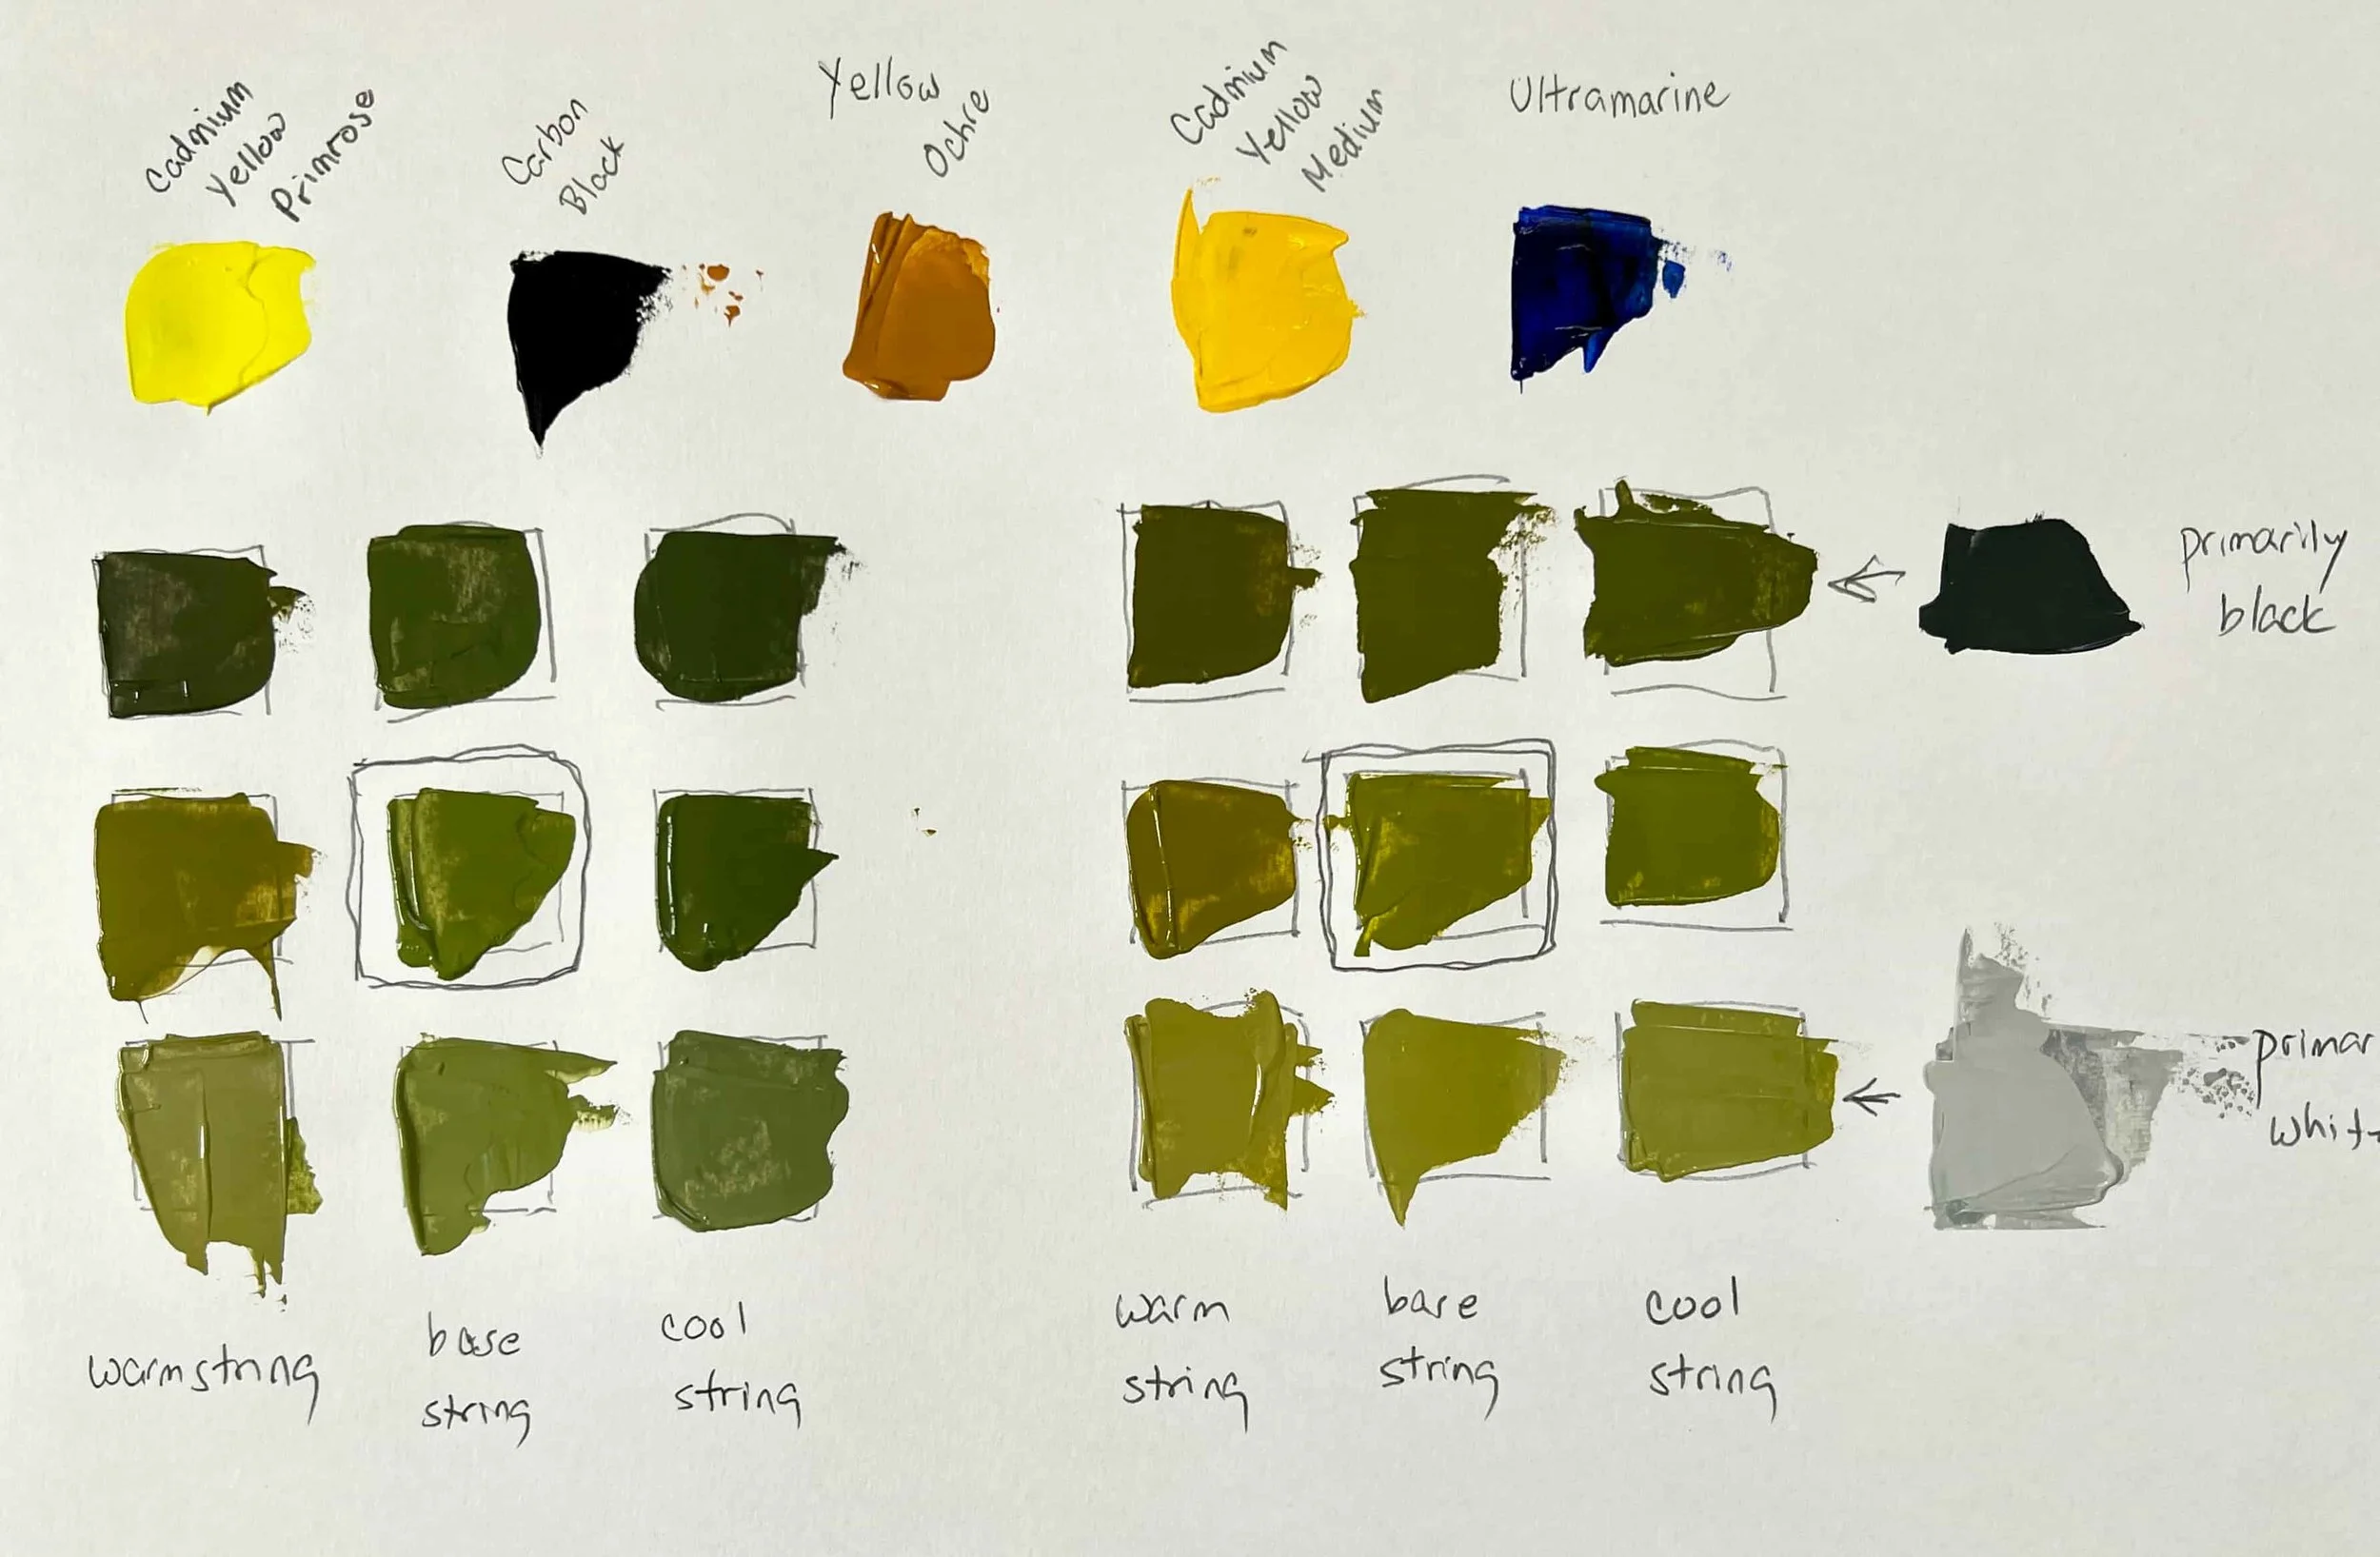
Recipe 1: The most natural base green (Cadmium Yellow Primrose + Carbon Black)
This mix will give you the most naturalistic greens, and it’s perfect for landscapes—especially representational landscapes.
What you’ll use
Black—I used Carbon Black from Golden. If you’re using oils, Gamblin Chromatic Black is perfect.
Either Cadmium Yellow Primrose (Golden) or Hansa Yellow Light (Gamblin—oil)
Step 1: Mix a mid-value base green
Start with yellow.
Add black slowly (very slowly because it can very quickly turn the yellow dark green) until you get a mid-valuegreen (not too light, not too dark).
A mid-value base gives you room to move the color in every direction.
Step 2: Modify temperature first (warm/cool)
Before you start changing value, decide if you need the green to feel warmer or cooler.
To warm the green: add a touch more yellow or yellow ochre, which is my preferred warmer.
To cool the green: add a tiny touch of blue (if you want to keep this recipe strictly “yellow + black,” just shift by biasing the yellow/black mix cooler by adding a hair more black and then bringing it back with yellow).
Why this order matters: once you start lightening/darkening, temperature shifts can get harder to read.
Step 3: Modify value second (light/dark) using 4 greys
For this recipe, we’ll keep the value shifts clean and simple by using a small “grey string.”
Mix 4 piles of neutral grey using only white + black. These will be our modifiers.
Grey 1: very light grey (mostly white)
Grey 2: light/mid grey
Grey 3: mid/dark grey
Grey 4: dark grey (mostly black)
Then:
To lighten your green, add Grey 1 or Grey 2 (instead of straight white).
To darken your green, add Grey 3 or Grey 4.
This keeps your green from getting too chalky (straight white) or overly harsh (straight black).
In the image above, I mixed only one shade darker and one lighter.
One thing to note about modifiers. They don’t have to be greys. You can modify with all kinds of colors—other yellows, blues and reds. Once you get the hang of mixing, try the others out.
BTW, I have a more in-depth mini-guide for mixing your own greens that you can get by signing up for my bi-weekly newsletter below. You can unsubscribe at any time. I’d love to send it to you.
Recipe 2: A brighter, more classic base green (Cadmium Yellow Medium + Ultramarine)
This is the “classic” mixing path, and it makes a cleaner, more saturated green than the yellow + black recipe.
What you’ll use
Cadmium Yellow Medium (Golden OPEN or Gamblin—oil)
Ultramarine Blue (Golden OPEN or Gamblin—oil)
Step 1: Mix a mid-value base green
Start with Cad Yellow Medium.
Add Ultramarine slowly until you get a mid-value green.
Step 2: Modify temperature first (warm/cool)
To warm the green: add a touch more Cad Yellow Medium or Yellow Ochre.
To cool the green: add a touch more Ultramarine.
Step 3: Modify value second (light/dark) using the same 4 greys
Use the same grey string as Recipe 1:
To lighten, add Grey 1 or Grey 2.
To darken, add Grey 3 or Grey 4.
Common problems + quick fixes
If you’re finding yourself not getting the greens you want right away, you’re not alone—greens can go sideways fast. The good news is the fixes are usually simple. When something looks “off,” it’s often just that the green is louder than everything around it in your painting, or it’s the wrong temperature, or it’s sitting at the wrong value (it’s too light or dark). A few small adjustments (instead of a big rescue mission) will keep the color clean and give you a green that actually belongs.
If it’s too neon: neutralize it with the tiniest touch of red (green’s complement). Mix it in gradually, and stop as soon as the intensity drops—a pin drop at a time.
If it’s too muddy: you’ve probably neutralized too far (or over-mixed). Mix a fresh, clean version of your base green, then:
nudge it brighter with a touch more yellow (or a touch more blue if you need it cooler)
check the value with your greys so you’re not trying to “fix” a value problem by changing the hue
Some of us really like muddy though.
If it doesn’t feel natural enough: it’s usually temperature and/or value.
warm it (more yellow) for sunlit, grassy, earthy greens
cool it (more blue or black) for shadow, distance, and deeper atmosphere
then adjust value with the greys until it sits in the space
Also remember: greens rarely live alone. A green that looks perfect on your palette can look totally different once it’s next to oranges, reds, or violets in the painting. If you can, test the mix right on the surface (or on a scrap), and let the surrounding colors tell you what the green needs.
If this post has been helpful, I have a more in-depth mini-guide for mixing your own greens that you can get by signing up for my bi-weekly newsletter below. You can unsubscribe at any time. I’d love to send it to you.